- Home
- Shoulder Exercises
- Frozen Sh Exercises
Frozen Shoulder Exercises
Written By: Chloe Wilson BSc (Hons) Physiotherapy
Reviewed By: SPE Medical Review Board

Frozen shoulder exercises aim to improve the range of motion at the shoulder joint, decrease pain and improve function.
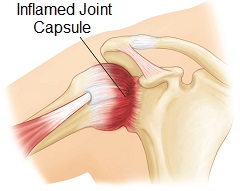
A frozen shoulder, also known as adhesive capsulitis, is a condition where thickening and inflammation of the shoulder joint capsule causes stiffness and pain.
There are three different stages with the condition and in each, different frozen shoulder exercises can be performed to help.
Here we will look at the best frozen shoulder exercises, how to do them effectively as well as how to progress the exercises through the different stages. If you want to know more about the causes and symptoms of adhesive capsulitis, visit the frozen shoulder overview.
All of these exercises are also suitable if you are recovering from frozen shoulder surgery.
Best Frozen Shoulder Exercises
Frozen shoulder exercises are looking to restore the movement that is lost with adhesive capsulitis. A frozen shoulder goes through three different phases:
- Phase 1 - Freezing Phase: The main symptom here is pain, with gradually increasing stiffness. Frozen shoulder exercises in this phase concentrate on maintaining movement and strength rather than trying to increase them as you do not want to push in to pain as that can aggravate things. Lasts 2-9 months
- Phase 2 - Frozen Phase: The main symptom here is stiffness, but the pain tends to reduce allowing you to push your exercises a bit further so you gradually regain shoulder movement. Lasts 4-12 months
- Phase 3 - Recovery Phase: Symptoms gradually resolve and you are able to do a range of strengthening and stretching frozen shoulder exercises to help you regain full movement in your shoulder. Lasts 6-36 months
Different frozen shoulder exercises will work best in the different phases of adhesive capsulitis so we have grouped them into three categories
- Pendulum Exercises: Perfect for phase 1 frozen shoulders
- Assisted Exercises: Can be used in all phases with simple adaptations
- Shoulder Stretches: Perfect for phases 2 & 3 of a frozen shoulder
1. Pendulum Exercises
Pendulum frozen shoulder exercises help to keep the shoulder joint moving in all directions and are most appropriate in stage 1 of adhesive capsulitis. They use gravity to move the shoulder rather than your muscles, so are very gentle and shouldn’t cause pain.
These phase 1 frozen shoulder exercises should not be painful. Keep your arm relaxed throughout, don’t push in to pain.
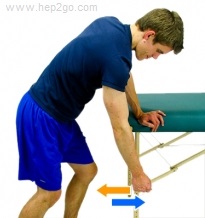
Forwards/Backwards Pendulum
- Stand with one leg in front of the other and lean forwards resting your good arm on a table or chair. Let your affected arm hang down
- Shift your body weight forwards and backwards allowing your arm to follow the movement as it gently swings freely forwards and backwards
- Continue the movement for approximately 1 minute, 2-3 times a day
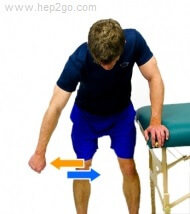
Sideways Pendulum
- Stand with your legs apart and lean forwards resting your good arm on a table or chair. Let you affected arm hang down
- Shift your body weight from side to side so that your arm swings freely from side to side
- Continue the movement for approximately 1 minute, 2-3 times a day
Pendulum Circles
- Stand with your legs apart and lean forwards resting your good arm on a table or chair. Let you affected arm hang down
- Shift your body weight in circles (clockwise) from your hips so that your arms freely circles round
- Continue this movement for approximately 1 minute and then change the direction (anticlockwise) and repeat for 1 minute. Do these 2-3 times a day (both directions)
Top Tips For Pendulum Exercises
- Think about your posture: you want to keep your back straight as you bend forwards. It may help to bend your knees slightly
- Start with a small movement: and gradually increase as able
- Keep your affected arm completely relaxed: it should be following your body movement, not leading it
- Progressing pendulum exercises: the further forwards you lean e.g. the lower the surface you rest your good arm on or the wider apart you have your legs, the more movement you will get in your shoulder with these pendulum frozen shoulder exercises
2. Assisted Exercises
Assisted frozen shoulder exercises aim to both maintain and increase shoulder movement as you progress through the different phases of adhesive capsulitis.
With these exercises the movement is led by the good arm, a stick or towel which support the weight of the affected arm allowing it stay relaxed so it can move through a greater range.
These assisted frozen shoulder exercises are suitable for phases 1, 2 and 3, with slight adaptions at each phase:
- Stage 1: During phase 1 of a frozen shoulder (painful stage), don’t push in to pain at all
- Stage 2: In phase 2 you are looking to gently push into the stiffness. It may be slightly uncomfortable when you do the movement but the pain should subside quickly when you return to the starting position
- Stage 3: During phase 3 the main problem will be stiffness rather than pain so you can push your frozen shoulder exercises a little more. You can hold the movement for 3-5 seconds and then see if you can move the arm slightly further before returning to the starting position each time
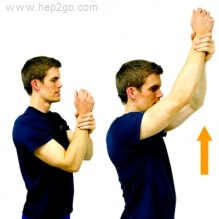
Assisted Flexion
- Start either lying down, sitting or standing. Gently grasp your affected arm at the wrist
- Gently raise your arms forwards and upwards, leading the movement with your good arm as far as comfortable
- Repeat the movement 10-20 times, 1-2 times daily
Top Tips: 1. Don’t let your back arch as your arm lifts and keep your rib cage down. Otherwise the majority of the movement comes from your upper back rather than your shoulder
2. Start with your elbow bent rather than straight as having a shorter lever can make the movement easier
3. As your movement improves, you may find it easier to support your affected arm under the elbow rather than at the wrist – you can often get more movement that way
4. As your arm comes up, keep the elbow bent and let your affected hand rest on your head and slide backwards as you gently lift the arm higher. It helps to support the weight of the arm and makes it easier to relax. This works particularly well if you are doing the exercise lying down
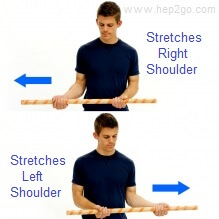
Assisted Lateral Rotation
- Start either sitting or lying down, hold a stick in both hands. Keep your elbows bent and your affected arm tucked in to your side
- With your good arm, gently push the stick sideways so your affected arm moves out to the side away from your body
- Repeat the movement 10-20 times, 1-2 times daily
Top Tips: 1. Keep the elbow of your affected arm by your side throughout the movement to ensure pure rotation
2. If the wrist of your affected arm moves awkwardly with this exercise (it can end up in a strange position to compensate for stiffness in the shoulder), place the palm of your hand (affected side) vertically (thumb up) on the end of the stick rather than horizontally over the top of the stick
3. Don’t let your body twist round as you do this, you want to isolate the movement to your shoulder
Assisted Medial Rotation
- Start by drawing both your shoulder blades back and bring both hands behind you, grasping the wrist of your affected arm with your good hand
- Gently bring your hand (affected side) towards your opposite buttock and slide the hand up your back
- Repeat 10-20 times, 1-2 times daily
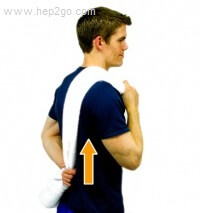
Progression: You can progress the exercise by using a towel to move the affected arm. Hold a towel in your good hand and drape it over your shoulder so it hangs down your back. Grab the bottom of the towel with your affected arm. Slowly pull the towel up with your good arm so your affected arm glides up your back
Top Tip: Keep your shoulder blades drawn back and your body upright through the movement – avoid the temptation to slouch forwards as while it may feel like you get more movement that way, it is actually coming from your upper back rather than your shoulder
3. Frozen Shoulder Stretches
Once pain levels have reduced and the primary problem is stiffness, you can start doing the following stretches. If you have had frozen shoulder surgery, you can start them immediately.
These frozen shoulder exercises help to improve shoulder movement in all directions by stretching out the joint capsule and surrounding soft tissues and are suitable for stages 2 & 3.
There may be some discomfort as you perform these frozen shoulder exercises but the discomfort should settle quickly when you stop the exercises. If you are still noticing discomfort after 30 minutes, that is a sign you have pushed things too much. Next time, reduce the range of movement or the number of repetitions.
Elbow Flares
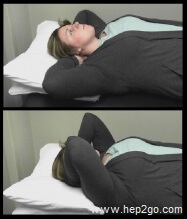
- Lie on your back with your knees bent and your feet flat on the floor/bed. Place your hands behind your head with your elbows pointing up to the ceiling
- Let you elbows drop out to the side, down towards the bed as far as is comfortable, to stretch the front of the shoulder
- Hold for 5 seconds and then bring the elbows back up towards each other as far as is comfortable to stretch the back of the shoulder. Hold for another 5 seconds
- Repeat in each direction 10-20 times, 1-2 times daily
Top Tip: Start by having your hands on the side of your head e.g. over your ears, and progress to having them behind your head to increase the stretch further
Prayer Stretch
- Kneel on all fours, hands underneath your shoulders, knees underneath your hips
- Gently sit back towards your heels feeling a stretch through your shoulder. Hold for 3-5 seconds
- Repeat 10-20 times, 1-2 times daily
Progressions: 1. Start with your knees further away from your hands
2. Hold the stretch for longer
3. Whilst holding the stretch, shift your hips to the side to increase the stretch under your shoulder – alternate sides
Finger Walks
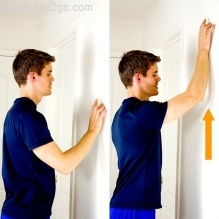
- Stand facing the wall and place the fingers of your affected arm on the wall, palm facing the wall
- Walk your fingers up the wall gradually reaching overhead. Hold for 2-3 seconds and then reverse walk your fingers back down
- Repeat 10-20 times, 1-2 times a day
Top Tip: you don’t need to walk your fingers all the way down to the starting position each time, just bring them down far enough to ease off the stretch
Table Reaches
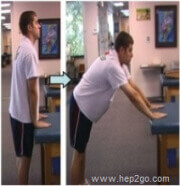
- Stand in front of a table or counter and place both hands on top of the table, palms down
- Keeping your hands still, step back away from the table, letting your upper body bend forwards until you feel a stretch in your shoulder. Hold for 3-5 seconds
- Repeat 10-20 times, 1-2 times a day
Progression: As you hold the stretch, shift your hips to one side. Hold and then repeat to the other side
Top Tips: 1. The further back you step, the more you will stretch your shoulder. You are aiming to get your arms (and upper body) parallel to the floor
2. If you find it hard to do this exercise standing up, sit on a wheeled chair or stool instead. Keep your hands still on the table and let the chair gradually roll backwards
Frozen Shoulder Recovery
Frozen shoulder exercises are looking to restore the movement that is lost with adhesive capsulitis. The movements that tend to be most affected are:
- Lateral Rotation: twisting your shoulder outwards
- Flexion: lifting your arm forwards
- Medial Rotation: twisting your shoulder inwards e.g. reaching behind your lower back
This is known as a capsular pattern of limitation with lateral rotation being most limited, then flexion, then medial rotation. Frozen shoulder exercises will look to target each of these movements. Flexion is often the first movement to return, medial and lateral rotation are usually the last.
If you are having physical therapy for frozen shoulder, you will probably recognize some of these exercises! Remember, if you are stage 1, you do not want to be pushing in to any pain with frozen shoulder exercises.
As you progress through stages 2 and 3, the pain levels will subside and you will find that the main limitation to these exercises is stiffness, not pain. Stick with them, aiming to do one to three sessions of frozen shoulder exercises each day.
If you are recovering from frozen shoulder surgery, remember that doing these exercises regularly (3-4 times a day) is really important to ensure you make the best recovery.
What Else Can Help?
These frozen shoulder exercises should help you to regain the movement in your shoulder, but remember, it is a slow process. It can take many months to recover from adhesive capsulitis so stick with it.
There are a number of other things that can help alongside frozen shoulder exercises - visit the frozen shoulder treatment section to find out more.
If your symptoms fail to settle after a few months of doing these exercises regularly, your doctor may advise you to have surgery - visit the frozen shoulder surgery section to find out more.
Page Last Updated: 02/02/2022
Next Review Due: 02/02/2022
